How to Fix your Garage door Sensor (Program your Remote)
Most garage door failures come down to a misaligned safety sensor or an unpaired remote. Both are usually a ten-minute fix with no special tools.
How to Fix your Garage door Sensor (Program your Remote)
When a garage door refuses to close, reverses halfway, or stops answering the remote, the cause is usually one of two simple things: the safety sensors are not seeing each other, or the remote has lost its pairing. Both are homeowner-fixable in about ten minutes.
This guide covers the safe, straightforward repairs. It also draws a clear line at the parts of a garage door that genuinely require a professional, because that line matters.
Safety first, and this part is not boilerplate
Never work on the torsion spring. The spring above the door stores enormous energy and can cause severe injury or death if released improperly. Adjusting, tightening, or replacing springs is professional work. Same for the lift cables.
Everything in this guide is limited to sensors, remotes, and basic cleaning — none of which requires touching the spring system. Unplug the opener before doing anything that involves the motor unit or wiring.
Diagnosing from the symptom
The door starts down, then reverses back up. Almost always the safety sensors. The opener sees an obstruction, real or false, and reverses by design.
The door will not move at all from the remote, but the wall button works. Remote or keypad problem — battery, pairing, or interference.
Nothing works from either the wall button or the remote. Power or motor. Check the outlet and breaker first.
The door closes but the opener light blinks afterward. Many openers blink a code to report a sensor fault. Count the blinks and check the manual on the motor housing.
The door is very loud or moves unevenly. Rollers, hinges, or track alignment. Worth a look, but a heavy or crooked door is a professional call.
Fixing the safety sensors
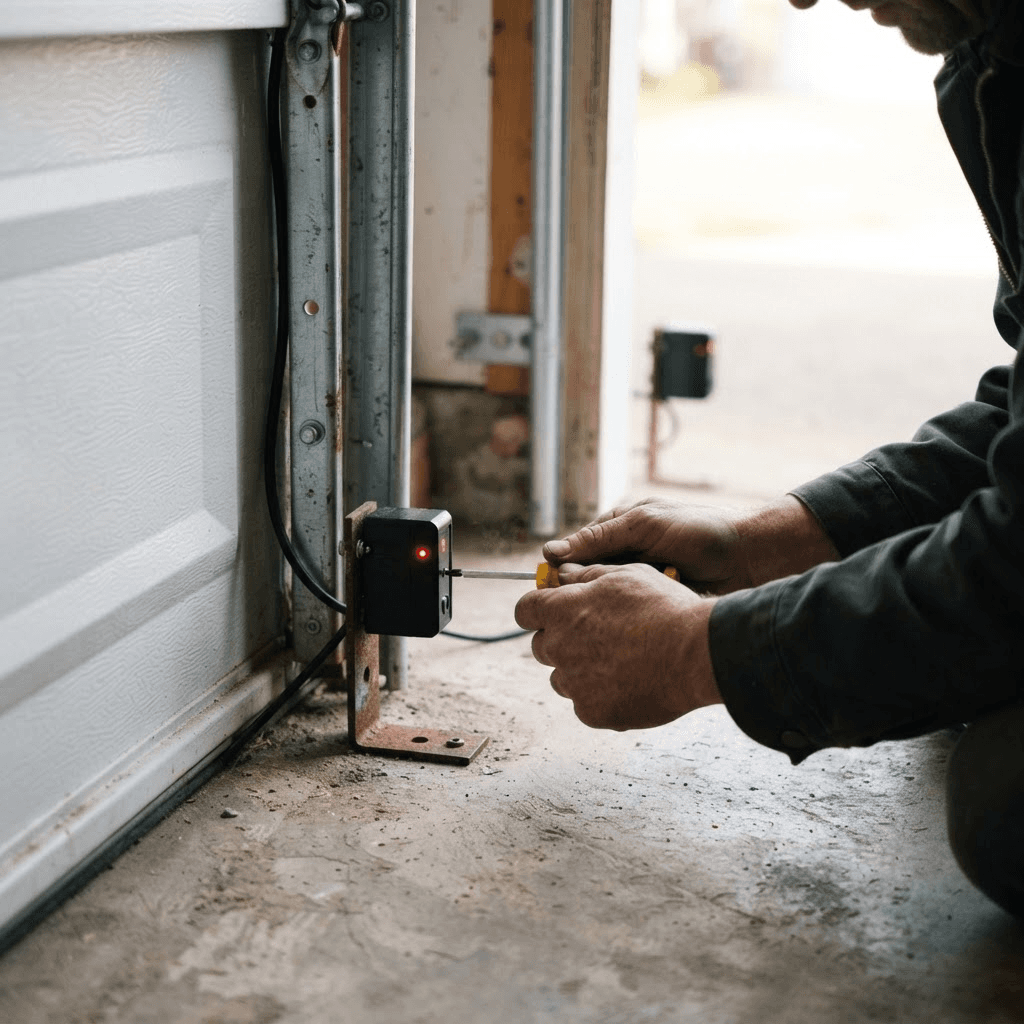
The sensors are the small units mounted near the floor on both sides of the door, about four to six inches up. One transmits an infrared beam, the other receives it. If the beam breaks, the door will not close.
Step one: clear the path. Move anything in the doorway. A stray broom handle or a bicycle wheel is the most common cause and the easiest to miss.
Step two: clean the lenses. Dust, cobwebs, and road grime block the beam. Wipe both lenses with a soft dry cloth. This alone fixes a surprising share of cases.
Step three: read the indicator lights. Each sensor has a small LED. On most models the sending unit stays lit steadily, and the receiving unit is lit steadily when aligned and off or flickering when not. A dark or blinking receiver means misalignment.
Step four: realign. Loosen the bracket wingnut just enough to move the sensor by hand. Aim it slowly toward its partner while watching the LED. When the light goes solid, hold it still and retighten. Small adjustments — a few degrees is often all it takes.
Step five: check the wiring. Follow the thin wire from each sensor back toward the opener. Look for staples pinching the insulation, breaks, or loose connections at the motor terminals. Rodent damage is common in garages.
Step six: test. Close the door and check that it goes all the way down. Then test the safety function deliberately: with the door closing, wave a broom through the beam. The door should reverse immediately. If it does not, do not use the door until it does.
Programming or reprogramming the remote
Start with the battery. Weak batteries cause intermittent range problems, which people often misdiagnose as a pairing failure. Replace it first.
Find the learn button. On the motor unit, usually under the light cover or on the back panel. It is a small colored button — often purple, yellow, red, or green depending on brand and era. The color matters because it indicates which protocol generation your opener uses, which determines which replacement remotes are compatible.
Pair the remote. Press and release the learn button. The indicator light will come on for about thirty seconds. During that window, press and hold the button on your remote until the opener light blinks or you hear a click. That is the confirmation.
Test from a normal distance. Not standing under the unit — from where you actually use it, like the end of the driveway.
To erase all remotes, press and hold the learn button until the indicator light goes out, usually six to ten seconds. This clears every paired device, which is the right move if you bought the house from someone else or lost a remote. You will need to re-pair everything afterward, including keypads and car built-ins.
When the remote still will not work
- Interference. LED bulbs in the opener are a notorious culprit. Some cheap LEDs emit radio noise that swamps the receiver. Swapping to a different bulb fixes a surprising number of "bad remote" cases.
- Antenna. A short wire hangs from the motor unit. If it is tucked up or broken, range drops sharply. Let it hang straight down.
- Compatibility. A universal remote must match your opener's protocol. Check the learn button color and the manufacturer chart before buying.
When to call a professional
Call someone if:
- The torsion spring is broken, or the door feels extremely heavy to lift by hand
- A lift cable is frayed, loose, or off its drum
- The door is off its track or visibly crooked
- Panels are bent or cracked
- The opener motor runs but the door does not move
- Sensors still fault after cleaning, alignment, and a wiring check
None of that is a failure on your part. Springs and cables are genuinely dangerous, and a door that has come off its track can fall.
Keeping it working
Twice a year, wipe the sensor lenses, lubricate the rollers and hinges with a garage-door-specific lubricant, and check that the door reverses on contact with an obstruction. Ten minutes of maintenance prevents most of the failures in this guide.
If this kind of diagnostic work is satisfying rather than tedious, that is worth noticing — the career explorer covers the trades where troubleshooting is the job.